Showing posts with label My Home. Show all posts

One Room Challenge - An Introduction and My Home Office

Thursday, October 6, 2016

Guys!  It's been quite a while since I've posted here, but I decided to blow the cobwebs off this blog and join in on the fun for this round of The One Room Challenge.  You know the one, it's where a group of bloggers select a room to redo from top to bottom in six weeks, sharing progress updates every week - Thursdays here - I'm one of the linking participants.

If we haven't met, I'm Kim Lemmon, and I own a  little design firm in Chattanooga, TN called The Green Room Interiors.  I'm all about classic design that feels fresh and vibrant, and since the room I'm doing for the ORC is in my own home, I'm excited that I can make it a true expression of my  personality and my personal style.  And isn't that what great design is all about?

Here's the room I completed for my very first One Room Challenge, about 3 1/2 years ago. It's the family room in my circa 1972 French Provincial ranch I affectionately refer to as "Project Dollhouse". The art on my gallery wall gets moved from time to time and I have since replaced the sofa with a vintage hunter green velvet Tuxedo sofa, but for the most part this room has functioned perfectly for our family. If only it stayed this tidy all the time.


My next ORC room was my kitchen, seen here:


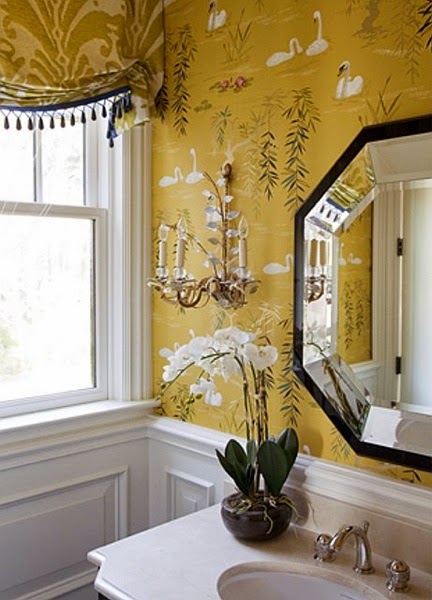
I also joined in on the fun as a linking participant with my hall bath makeover seen below. I'm still completely smitten with the Brunschwig & Fils damask wallpaper:


and then finally, my living room and dining room combo: 


Do you feel like you know me a little better now?

Great, because what I'm going to show you now is tough.  Trust me, it's even more painful for me than it is for you.  It's an empty bedroom I'm claiming as my home office. I may or may not have organization/storage issues that need to be addressed.  Luckily my assistant is pretty cute.

When you don't have proper storage, stuff ends up all over the floor.  Infrequently used exercise equipment will be relocated to the basement, where it is even less likely to get used.


Nice.  The upside is that with before photos this bleak, there's nowhere to go but up.

I do hope you'll come back next week  to learn about my plans for my command central.  I'm sure it will come as no surprise to you that you won't see gray walls and neutral furnishings. I adore surrounding myself with beautiful color and find it so exciting to come up with interesting color combinations.  So that's what we'll be doing over here anyway.

Thanks for stopping by!  Please make sure to visit the main event bloggers  here and all of the other linking participants here

And a big thank you to  Linda at Calling it Home for dreaming this all up and hosting.

If you're in the Chattanooga area and in need of some design help,  please feel free to contact me at The Green Room Interiors 423.653.3186 or email thegreenroominteriors@gmail.com.  You can also visit my business website here.

See you next week!


Leopard and Floral

Sunday, November 16, 2014

Happy Monday!  First of all I want to thank everyone who took the time to stop by and see my bathroom reveal for The One Room Challenge.  Your kind comments and emails were greatly appreciated and I'm happy to report that just walking by that space brings a smile to my face.  How poetic.

Today I want to talk to you about combining leopard with floral prints.  The reason I started thinking about this particular combination came about during my last visit to my Mother's house in Atlanta.  She was asking me about updating her living room and we started talking about changing out some pillows.  I suggested leopard and her response was "with the flowers"?.

I was surprised that she had reservations about combining the two.  After all, she loves a good pattern mix as much as I do.

And clearly I have no qualms about mixing floral with leopard.


Miles Redd is no stranger to the leopard/floral mix, as seen here in House Beautiful.


Nor is Nick Olson:


So I say leopard and floral are completely compatible.  And speaking of mixing traditional prints with leopard, I'm considering adding a leopard rug to this bathroom.

Leopard and damask?  Works for me.

The Green Room Interiors provides Interior Decorating and Design Services in Chattanooga, TN.  If you'd like to discover the joy of living in a well designed home, contact Kim Lemmon at 423.653.3186 or email thegreenroominteriors@gmail.com

Are you following me?   Instagram     Pinterest     Facebook


One Room Challenge Week 5 - Finally Wallpaper

Thursday, October 30, 2014

I bet you thought I was going to be a no-show today.  The reason I'm posting so late  is because my wallpaper ladies finished hanging my bathroom just moments ago and I wanted to wait until they were done so I could show you pictures of something more than sheet rock dust and a toilet.

But before we get to that, I want to thank you for checking in on my week FIVE (!) progress of the One Room Challenge.  In case you're not familiar, it's the internet sensation (if you like this sort of thing) where bloggers make over a room from start to (hopefully) finish in 6 weeks posting their progress every week either on Wednesday or Thursday. The entire concept for this event was dreamed up by Linda and you'll find links to all participants here and here.

Now, on to my bathroom situation.  If you follow me on Instagram then you already know I got cold feet where my wallpaper was concerned.


 Because although that damask pattern is pretty, it's also super traditional, kind of gigantic,  and somewhat formal.  So I did what any insecure, self-doubting decorator would do.  I put it in front of my Instagram followers to decide.


Yes, the damask had a formidable opponent in this latecomer. I mean who doesn't love a good bamboo treillage wallpaper?  I certainly do and apparently my Instagram followers do because they voted for the treillage paper over the damask.

And after all of that input and indecision,  I followed my heart and took a leap of faith with my original choice.


iPhone 4S photos cannot accurately capture the magnificence of this paper. And I also have to say that in this world of seamless glass and showers and understated finishes, my heart will always belong to pretty color combinations and interesting pattern mixes.  

In other bathroom news, I hinted last week that I was considering painting the wainscoting blue, yet I decided to keep it crisp and go with white. But now I think I want to paint my boring door black.  What do you think?

So there is lots left to do to get ready for next week's reveal.  We haven't even begun to convert the buffet, much less pick out  a sink and faucet. We are tired and somewhat overwhelmed.  But the good thing about week 5 is that the finish is in sight and it kind of gives you the shot of adrenaline you need to bring it all together for the reveal.  That's what I'm hoping anyway.

So I'll see you back here next Thursday.  If you absolutely cannot wait to see more bathroom tidbits or you just want to show some love and devotion, I suggest you follow me on InstagramPinterest and Facebook.  I can't wait to show you my finished bathroom!


The Green Room Interiors provides Interior Decorating and Design Services in Chattanooga, TN.  If you'd like to discover the joy of living in a well designed home, contact Kim Lemmon at 423.653.3186 or email thegreenroominteriors@gmail.com

One Room Challenge Week 4 - A Little More Progress

Thursday, October 23, 2014

Welcome to this week's installment of the One Room Challenge.  In case you're not familiar, this is the event created by Linda from Calling It Home where participants make over the room of their choice in six weeks sharing their progress once a week along the way. I have been linking up with the makeover of my hall bathroom.  Week 4 is always tough,  and I feel like I haven't completed nearly as much as I had hoped to at this point.  

Remember last week when I shared that I was planning to do a wall of antiqued mirror tiles behind my vanity?  The good news is I got all of the mirrors successfully antiqued and I'm  pretty happy with how they turned out.


The not so good news is that we haven't had a chance to install the tiles on the wall yet.  :-( .

In other news, the wall repair has been a huge undertaking.  There has been sanding and more sanding followed up by more sanding. And you know how awful that superfine sheet rock dust is. My husband came out of the bathroom on Sunday looking like a powdered donut.


Here's something positive. The box molding has been added to the lower third of the walls (Yay)


and I'm thinking that rather than painting it out white, I'm may just paint  the wainscoting a shade of blue that's slightly darker than the blue in the wallpaper.


Benjamin Moore Buxton Blue in particular.  What do you think about that idea?  Do you like the idea of painting the wainscoting blue or would you paint it white?

I'm also struggling with whether to go with a vessel sink or a drop-in sink for my antique piece turned bathroom vanity.  Originally I had planned go with a drop-in sink but after consulting with Professor Pinterest, I think the vessel sinks look so much better in this situation. Look:


Don't you agree?  I think the vessel sink looks so much better.  

This is all of the progress I have to share with you today.  Things should really start to come together next week (really!) as the mirror wall will be installed, the rest of the trim will be installed and painted, and I'm hoping to get the paper up and the vanity placed. It's an ambitious list.

Say a quick prayer for me and be sure to tune in next Thursday.  To find the links to all of the other participants, click  here and  here .


ORC Linking Event - I'm Doing My Hall Bath

Thursday, October 2, 2014

It's time to clear the cobwebs off of the ol' blog and start cranking out some serious decorating posts.  As you may have guessed, I've decided to join in on the internet's biggest decorating sensation - The One Room Challenge.

I'm participating in the Link-up event which airs for the next 5 consecutive Thursdays, so for goodness sake please come back to check in on my progress!  I need your feedback and encouragement! Mostly because of this ridiculousness:


Enter aforementioned hall bath in its current state.

As you can see it's crying out for help.  In a big way. Those walls.  They look like this because a few weeks ago I spent hours stripping off the top layer of wallpaper only to find ANOTHER layer of old wallpaper combined with unsized skim coated sheet rock in other areas.  Holy. Wallpaper. Hell.

This is what happened where the wallpaper was applied to a skim coat of bare sheet rock mud.


It totally damaged the sheet rock underneath.  I know what you're thinking.  "Thank goodness you have that pretty mirror".  True, but a lot of hard work needs to happen before we can revel in the goodness of the mirror.

And rather than do up an inspiration board, I'm going to drag you down this road with me one post at a time because some decisions have yet to be made.  

Before you go, let's have a look at some bathrooms that are inspiring my little makeover shall we??


Yes, there will be wallpaper in the damask category. And it's super gorgeous because that's what Brunschwig & Fils does.   I gave you a sneak peek here.


And no ORC makeover of mine would be complete without repurpose-ing a piece or two of vintage furniture.


This is so gorgeous it takes my breath away. And it makes me wish I had been born with the "understated" gene.  But let's not kid ourselves.  We're more likely to see something with more color, pattern and layers. 

and I'm okay with that.

So, same time next Thursday???

You can find links to all of the other participants on Linda's  (our hostess and mistress of ceremonies) blog here.  And in case you missed the ORC participants that posted yesterday, find those links here.  Hours of entertainment.  Literally.

PS.  I'll likely be posting little updates on my Instagram feed so let's buddy up.


A Few Updates at the Dollhouse

Monday, July 14, 2014

Hello there!  I hope you're having a great summer so far, even though it seems to be passing by so quickly!

Today I wanted to share a few little updates we've managed to get done at over here at The Dollhouse.

Let's start big.  Unbeknownst to you my foyer has been nothing more than a plywood sub floor for some time now.


  I'm elated to report that over the weekend my hubby changed that situation for the better.


Yay!  And I think there's an opportunity for some sort of fun albeit small piece for the wall to the left, so I'll keep you posted when I find my love match. 

Also, if you follow me on Instagram, then you already know that I recently purchased this sketch from a local artist.


and I've incorporated it into this vignette in my family room.  It's getting increasingly hard to find places to put things at my house.  I have no book cases or  mantels and my rooms are narrow so I don't even have side tables in most cases.  It's a struggle for this collector, so I'm layering art where I can.


So what's next you ask?  I've got my sights set on the hall bath.  When we moved in we tore out the old linoleum flooring and the tub surround  and replaced all of that with new white tile. 

Nothing extravagant, but I wanted white tile to brighten up this dark space and make it feel cleaner.  I don't want to spill too many details about my plan for this lackluster space but I'm very excited about moving forward and I think it will be one of my very favorite makeovers at The Dollhouse.  

In the meantime, this 1970's wallpaper is being stripped 


and will be replaced with a Brunschwig & Fils kind of gorgeous.


and that's just the beginning.  Stay tuned, and if you'd like to stay updated with all things The Green Room Interiors, the best place to find me is on Instagram, so please follow along!

The Green Room Interiors provides Interior Decorating and Design Services in Chattanooga, TN.  If  you'd like to discover the joy of living in a well designed home, contact Kim Lemmon at 423.653.3186 or email thegreenroominteriors@gmail.com


ORC Week 5 - China Cabinet and Chairs Get Zhushed

Thursday, May 1, 2014

Welcome to week # 5 of Linda's One Room Challenge Linking Event.  I'm making over the living room/dining room combination in my humble little abode known as Project Dollhouse.  If you'd like to see where it all began and get caught up on my progress up to this point, you can do that here.

Today I have a few makeovers to share with you.  As much as I'd like to get all new everything at my place, the cold hard truth is that just isn't in the budget.  So that means I'm working with a lot of the things I already have, and have had for decades.  One such thing is my corner china cabinet I've had since circa a long time ago.  Like one of the first pieces I bought as a young bride, when I thought it was cool to buy a dining room "set".

Here's the Where's Waldo version of my china cabinet, with my china cabinet playing the part of Waldo

Yes, there it is in the circular mirror in a dining room 3 houses and about 5 years ago. This the only picture I could find and once again, I failed to take a proper "before".

I decided to strip it of its dated arched glass top door leaving the top portion open and then painted the whole thing black.  I also wanted to do something unique with the interior and I found the perfect something in this TJ Maxx wrapping paper. So I Modge-Podged it to the inside of the china cabinet.  I don't have pics of that process because have you ever tried to photograph yourself whilst modge podge-ing paper to the inside of a cabinet?  It can't be done.


Did you know I love anything marbleized?

Brace yourselves: here come the grainy night time iphone pictures. I decided the simplicity of the white pieces inside would be a nice counterpoint to the marbleized paper, but I will probably play around with it some more.


Okay then!  Also underway is a fluff on a set of Chippendale chairs for my dining room table. I even have a proper "before".


They got the old white paint treatment and are currently getting some super groovy fabric thanks to my girl Kimber who can hook you up with the most amazing assortment of swoony fabrics and wallpapers under the sun!


One almost down and 3 to go. 

Hope everyone else if faring well, and I hope to see you back here next Thursday for the reveal of my living room and dining room makeovers!

I plan to post updates each day this week on my Instagram feed.  Follow me!

The Green Room Interiors provides Interior Decorating and Design Services in Chattanooga, TN.  If you'd like to discover the joy of living in a well designed home, contact Kim Lemmon at 423.653.3186 or email thegreenroominteriors@gmail.com 


One Room Challenge Week 4 - Brass & Glass Pagoda Chandelier Makeover

Thursday, April 24, 2014

Okay so I missed posting my progress last week.  Rest assured that even though I didn't get a chance to post everything that went down over here, I have been making sweet progress in my living room/dining room makeovers. That DOES NOT mean that I still don't have major concerns about getting the room to full completion on time.  I'm at the mercy of my upholsterer for a few things and he's pretty covered up right now.

In any case I'm going to put my worries aside and share a little progress I've made in the dining room.  And there's a DIY involved that meets two major requirements.  It's quick and easy.

So I have your attention now?  Meet my circa 1970 something brass and glass chandelier that was practically free at my Habitat for Humanity store.

I'm sure it's no secret why I was drawn to this fixture. (Hint: It starts with a "p" and rhymes with "lagoda.")  Of course I love that! But what I wasn't crazy about was the highly lacquered brass finish. I wanted something warmer and softer, but still gold.

I'm sure you already know where we're going with this.
After removing the glass I quickly and not so carefully applied rub n buff to all brass parts that I could see well enough without my reading glasses on.


I'll give you that the change at this point is subtle.  But we're not done yet. I thought it might be fun to update the glass by doing an antique mirror finish on the glass panels.  I've seen a number of tutorials on Pinterest and then again on Little Green Notebook.  

So I laid the glass panels face side down on a tarp and sprinkled them with a mixture of water and vinegar.  I didn't measure how much of each.

Then I sprayed them with this stuff (found on the shelves of my local Wal-Mart)


See how the vinegar/water solution lays on top of the glass?  Just grab a paper towel and blot/lightly wipe it off. 


As a final step I  sprayed on a coat of black to "age" those bare spots.

And then it was just a matter of reassembling the chandelier.


And all put back together and lit up.

Told you it was quick and easy!!

Thanks for checking in on my progress! 

And 2 weeks to go!! Yikes! (x 2)

The Green Room Interiors provides Interior Decorating and Design Services in Chattanooga, TN.  If you'd like to discover the joy of living in a well designed home, contact Kim Lemmon at 423.653.3186 or email thegreenroominteriors@gmail.com